
Throughout this site, you will find my posts neatly sectioned into either ‘Art’ or ‘Science’. But this is going to be one of those posts that is hard to categorize. What I describe here is both art and science, and this is what I love – the constant tension and affinity between them.
I remember reading Dan Brown’s Angels and Demons a long time back. The book introduced me to the Illuminati and more importantly to the world of Ambigrams. For those who don’t know what an Ambigram is, here’s a definition from Wikipedia –
An ambigram is a word, art form or other symbolic representation whose elements retain meaning when viewed or interpreted from a different direction, perspective or orientation.
I remember trying to draw my first ambigram, for the name ‘Mike’, and I surprised myself by how quickly and easily I was able to draw an ambigram of that name. I experimented with more names over the years, and became quite adept at turning random names into ambigrams.
After I built my 3D Printer, I realized I could design rubber stamps (that may be used as signatures on artworks) that implemented these ambigrams. So when a friend of mine, an artist in her own right (see doodleninja.in), approached me with a request for an ambigram of her name, I decided that this was the opportunity I’d been waiting for (you could ask me why I didn’t just amigrammify my own name and turn it into a rubber stamp, but I have a rule to never create an ambigram of my own name. Never ask me why. You’ve been warned.)
Her name is Rumana, and this is the ambigram of her name:
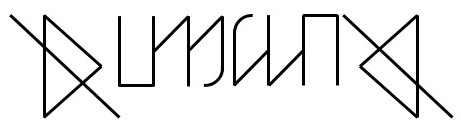
If you flip it 180 degrees (vertically), you will still be able to read ‘Rumana’ as ‘Rumana’. I realize I am skipping over how I made this ambigram, and I’ll publish a post on my process later, if there’s enough interest. For now, I’d like to focus on turning this line drawing into an actual physical, usable rubber stamp.
Step 1.
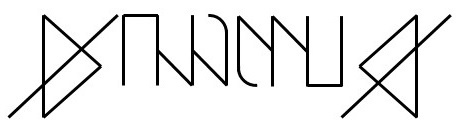
If I were to turn the above drawing into a stamp as it is, it would print in reverse, because whatever is on the stamp is mirrored when stamped. So I had to flip the whole thing on itself (horizontally) before I turned it into a 3D shape:
Step 2.
I used a 2D to 3D converter (available online) to convert the above line diagram into a 3D shape:

If you’re trying to read the name and it doesn’t make any sense, that’s because it is flipped horizontally. This is because when it finally takes shape as a stamp and you dip it in ink and press the stamp on paper, you get a mirrored imprint, correcting the flip.
Step 3.
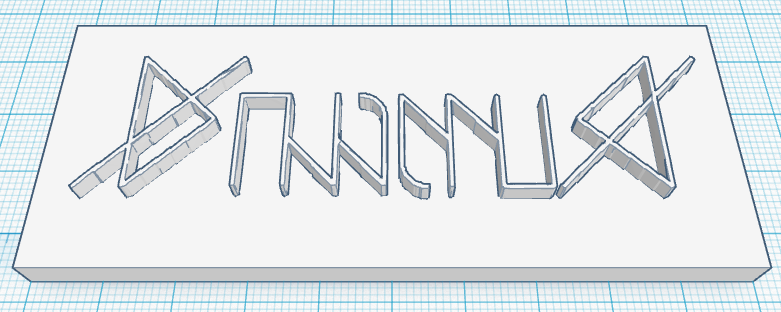
Now that I had a 3D shape of Rumana’s ambigram, I set about to work on the actual shape of the stamp. For this, I used TinkerCAD, another online tool.
After fooling around with many ungainly designs that would have taxed the printer, and after completing a design that would have needed many support pillars for it to properly print, I split the stamp into two basic parts:
- The Base, containing the ambigram
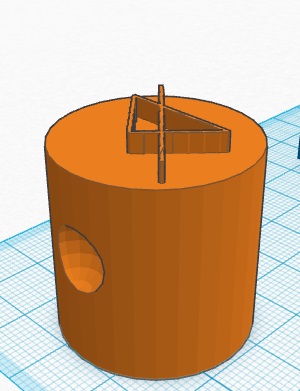
- The Holder, containing a method to hold the base that would be finger friendly and easy to grip.
Splitting the stamp design into two simplified the whole thing. If it had been a monolithic design, the base of the stamp would have had to be lifted on supports (calculated by the printer) to create the space needed to draw the ambigram on the bottom. After splitting, this is how the base looked:
And this is how the holder looks, with grooves inserted for fingers:


Then I wanted to make a simpler holder design, something cylindrical, and I ended up with this (with a three-finger grip for comfort):
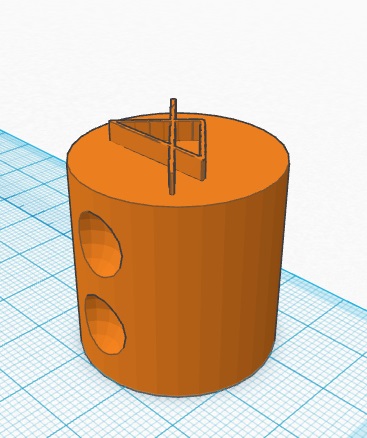
Once they are printed, the plan is to simply glue the holder and base together.
I am happy with these designs, and I am itching to print them into existence. The printer is sadly dismantled right now as I am working on some serious upgrades, but as soon as it is ready to print, the Ambigrammatic Stamps will be the first things I’ll make. I’ll keep you posted.
Thank you for reading. If you want to have your own name ambigrammified and then turned into a stamp, feel free to drop me a mail.

Leave a comment