
What is a 3D Printer?
If you are reading this, then I will assume that you know and understand what a 3D Printer does and what 3D Printing is. Just to be clear, 3D Printing, or Additive Manufacturing, is a manufacturing technique that builds objects by depositing layers of material one on top of another. Starting from nothing, the object rises layer by layer until it is completely ‘printed’. As an object is created by ‘adding’ material to the object instead of ‘removing’ it (as in sculpting), this form of manufacturing is known as ‘Additive’ Manufacturing. A 3D printer, therefore, is a device that builds or creates object using additive manufacturing principles.
How does it work?
The most common form of additive manufacturing technique in use today is called Fused Deposition Modeling (FDM), or Free Form Fabrication (FFF). These are technical jargons that we will not be looking into. It is enough to understand that in an FDM or FFF types of 3D Printer, an ‘extruder’ melts the material with which the object is to be made and deposits this melted material on a flat platform (which may or may not be heated – we will talk about this later) layer by layer by layer, until the object is formed completely.

That’s the gist of what a 3D printer is and how it works. Now, let’s get into the meatier topic of how to actually build one. I asked myself this question in October of 2014, after spending 18 months listening to just about everybody talking of how “very soon” desktop-sized 3D printers would be cheap enough to become affordable. When it did not happen soon enough for me, I decided to bite the bullet and build a printer myself.
How to build one?
In a sentence – the only way you can build a 3D Printer by yourself is by receiving a lot of help from the internet community of DIY 3D Printers. One of the largest open-source 3D printer community out there is known as RepRap. The eponymous product of the community is a machine that essentially wants to be capable of self-replication. A reprap machine is capable of 3D printing parts for itself, as we will learn. The RepRap community’s self-stated goal is to make ‘self-replicating machines, and making them freely available for the benefit of everyone’.
A noble purpose.
When I learnt about RepRap 3D printers I realized that here I would find all the know-how and assistance I would need to build a 3D Printer – at home and from scratch. The idea that such a community existed, to help itself and each other grow, all the while creating products that depend on Open Source Software and Hardware, was frankly eye-opening, not to mention a perfect storm of events.


The Ingredients
The first question to obviously ask is – what do I need to build a 3D Printer? Here’s an insightful component structure I stole from the RepRap page just for you:
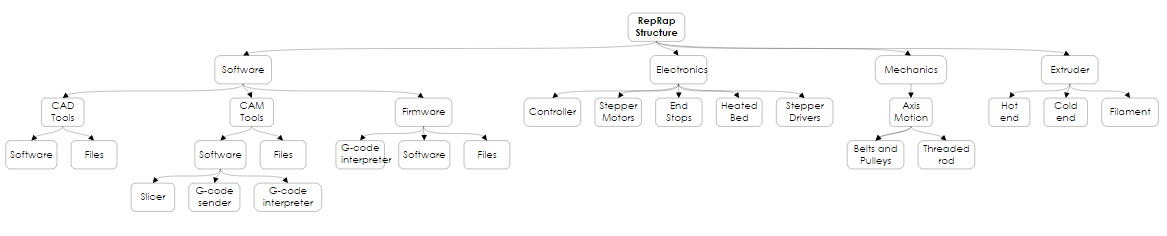
In short, and without beating around the bush, here’s the bill of materials you need to build your own 3D Printer (Please note that these are the materials that I used to build my printer. You may find a completely different list elsewhere on the web):
Heated Bed:
- 1 x MK2A Heated Built Platform (PCB Heatbed)
- 1 x Glass Plate
- 1 roll of Kapton Tape
- 4 x Binder Clips
- 1 x Thermistor

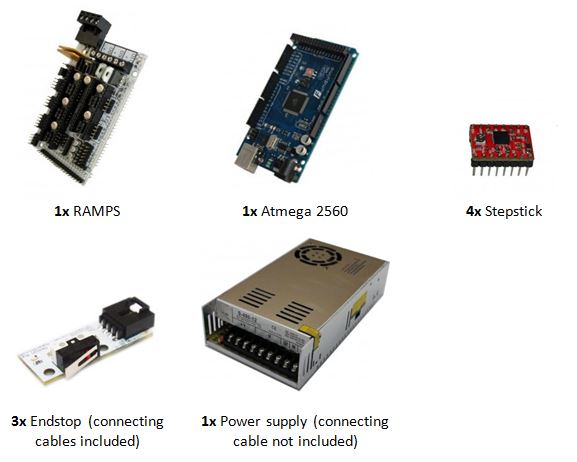
Electronics:
- 12V 10A Power Supply
- RAMPS 1.4 Shield
- Arduino Mega 2560 R3 Control Board
- Pololu Stepper Driver x 5 (with heat sinks) (one for each of the 5 Stepper Motors)
- 1 x MKIV J-Head Hot End.
- 3 x Mechanical or Optical End Stops.
Mechanical Parts:
- GT2 20-Tooth Aluminum Pulleys x 2
- GT2 Timing Belt 1.7m
- Nema 17 Stepper Motors x 5
- Precision Rods –
-
- 2 x Smooth rod Ø8×320 mm
- 2 x Smooth rod Ø8×350 mm
- 2 x Smooth rod Ø8×370 mm
- 2 x Threaded rod M5x300 mm
- 4 x Threaded rod M10x210 mm
- 2 x Threaded rod M10x380 mm
- 11 x LM8UU Bearings
- 2 x Coupling 5*5
- 1 x 624 Ball Bearing
- 4 x 608 Ball Bearing

Printed Parts:
- 1 x X Carriage
- 1 x X End Idler
- 1 x X End Motor Mount
- 1 x Y Belt Holder
- 4 x Y Corner
- 1 x Y Motor Mount
- 1 x Y Idler
- 1 x Z Axis Top Left Holder
- 1 x Z Axis Top Right Holder
- 1 x Endstop Z Holder
- 1 x Z Axis Bottom Left Holder
- 1 x Z Axis Bottom Right Holder

These printed parts are made using a 3D printer, and then go into the construction of another 3D Printer, serving the outstanding goal of the RepRap community to build a ‘machine that could build itself’. But the question arises – if I don’t have a 3D Printer, how do I print these parts? There are DIY 3D Printers out there who will gladly help you print these parts using their machines. You can contact them, or me, to get an entire set of printer parts home delivered to you.
Extruder:
- 1 x Wade Extruder Body
- 1 x Extruder Idler
- 1 x Fan Duct
- 1 x Wade Small Gear
- 1 x Big Wade Gear
- 1 x Hobbed Bolt
- 1 x Fan 4*4
- 2 x Springs

Frame:
- 1 x Acrylic Frame
- 1 x Acryclic Base Plate
It is not necessary to make the frame in Acrylic – it can also be made in aluminium, or steel. People have also used wood and cardboard. But for sturdiness, it is best to go with aluminium or acrylic. These are laser cut frames – if you have a CNC shop near you, you can download the laser cutting files (.dxf format) from here, and send them over to your to the CNC shop to get the frame cut for you.
Screws, Nuts & Washers:

These are the physical things you need to build a printer. What you’ll also need in ample amounts are things that are harder to classify, such as patience, time and money. If you have all of these things, the physical and the non-physical, then we can start building the printer.
Let us begin.

Leave a comment